Basement Bars That Actually Get Used: Design Lessons From Real Projects
Here's an uncomfortable truth from someone who builds these for a living: roughly half the basement bars in American homes are expensive shelving. Gorgeous on the walkthrough, used enthusiastically for two months, then quietly demoted to the place where the good glasses live.
The other half become the actual center of the house — the Friday night default, the game-day headquarters (as promised in our opening-weekend post), the reason friends come to your place instead of anywhere else.
The difference between the two is almost never budget. It's a handful of design decisions — most of them about location and workflow, not finishes. After years of building both kinds (and occasionally being hired to fix the first kind), here are the lessons, with honest 2026 costs.
Lesson One: The Bar Goes Where the People Already Are
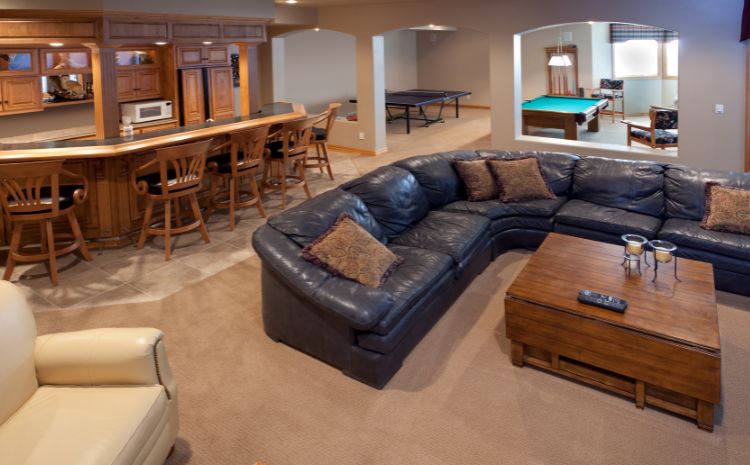
The single biggest predictor of whether a bar gets used: proximity to the action. Bars fail when they're architectural islands — tucked in a far corner, in a separate room, or positioned so the bartender faces a wall with their back to the party.
The bars that work share a placement pattern:
- In the same visual space as the media/gathering zone — the host pours while watching the game, guests drift between screen and counter without leaving the party (the "two gravity centers" principle from our game-day post)
- Bartender faces outward. The working side of the bar faces the room. This one orientation decision — identical cost either way — is the difference between a social hub and a service window.
- On the natural traffic path — near the stairs or the route to the bathroom, so the bar is passed, not sought.
If your basement layout is being designed right now, this is a framing-stage decision. Position the bar first, with the media wall — everything else arranges around those two anchors.
Lesson Two: Dry Bar vs. Wet Bar — the Honest Decision
The wet bar (with plumbing) is the default request. It's also the most commonly over-bought feature in basement design. The honest sort:
The dry bar — $3,000-$9,000 — is the right answer more often than people think. Counter, cabinetry, beverage fridge, backbar shelving, great lighting. No sink. Here's the underrated truth: the beverage refrigerator does 80% of a bar's daily work, and it needs an outlet, not a drain. Households whose real usage is beer, wine, seltzers, and mixed-from-bottles drinks use the sink in their wet bar a handful of times a year — and wash glasses in the kitchen dishwasher anyway.
The wet bar — $8,000-$25,000 — earns its plumbing in three scenarios: (1) you genuinely cocktail-tend — bitters, shakers, rinsed tools, the full ritual; (2) the basement is a self-contained entertaining floor where trips upstairs break the flow (especially with the bathroom already pulling plumbing down — marginal cost drops when the drain lines share a run, a synergy we'll detail in the basement bathroom post in two weeks); (3) resale positioning in the premium tier, where "full wet bar" is an expected line item.
The wet bar range swings on the same physics as the bathroom: existing rough-in or drain proximity = low end; breaking slab and possibly an ejector pump = high end. If the plumbing math is ugly, spend the difference on a better fridge, an ice maker (the actually-used luxury — $1,500-$3,000 installed, no drain needed for many models), and lighting.
The middle path most families should consider: plumb the rough-in, build the dry bar. $1,500-$2,500 during construction buys the capped drain and supply under the bar. If year two proves you want the sink, it's a weekend project instead of a demolition.
Lesson Three: The Backbar Is the Bar
Walk into any great bar — commercial or home — and what you're actually looking at is the backbar: the lit wall of shelving and glass behind the counter. The counter is furniture; the backbar is the theater.
The elements that make it work, in cost order:
- Floating shelves against a feature wall (tile, wood slat, dramatic paint): $800-$2,500. The single highest visual-return dollar in the whole bar.
- LED lighting — under shelves, above cabinets, dimmable and warm: $400-$1,200. Non-negotiable. An unlit backbar reads as storage; a lit one reads as a destination. Cheap, transformative, and the most commonly skipped item on DIY builds.
- Glass-front refrigeration (beverage center, wine fridge): $600-$2,500 per unit. The glass front matters — visible cold inventory is both function and decor.
- Closed storage below, open display above. The formula that keeps it looking like a bar instead of a pantry: pretty things at eye level, practical things behind doors.
Lesson Four: Size the Seating for Actual Life
Bar seating math, learned from watching how these rooms actually get used:
Three to four seats is the sweet spot. Two feels lonely; six turns the bar into a dining table and the counter into a service problem. The crowd doesn't all sit at the bar — it clusters around it (the layered-seating principle from the game-day post: bar seating is the second row behind the sectional).
24 inches of width per seat, 12-15 inches of knee-space overhang — the same clearance discipline as kitchen islands, and violated even more often. Stools crammed at 20-inch spacing against a flat cabinet face are decor, not seating.
Backed stools, always, if people will actually sit longer than one drink. The backless minimalist stool is the single most-regretted furniture purchase in basement history.
Counter height (36") vs. bar height (42"): counter height wins for households with kids (homework happens at bars constantly — the bar is a desk in disguise) and for anyone planning to age in the house. Bar height wins for the classic look and better sightlines over the sectional to the screen. Legitimate either way; decide by use, not photos.
Lesson Five: Durable Luxe, Not Delicate Luxe
Bars take abuse: wet glasses, dropped bottles, citrus acid, teenagers. The finish package that survives:
- Quartz counters — the non-negotiable. Waterproof, stainproof, and the bottle-slam survivor. Butcher block looks warm and scars fast; if you want wood, put it on the shelves.
- LVP or tile underfoot in the bar zone even if carpet lives elsewhere in the basement — the spill zone is predictable.
- Semi-gloss or performance paint on the bar wall, tile backsplash behind any sink.
- Solid cabinet hardware — the bar's doors and drawers get opened more than any others in the basement.
Total finish delta between "delicate" and "durable" at build time: nearly zero. It's a selection discipline, not a budget line.
What Complete Bars Cost in 2026
Pulling it together, St. Louis pricing within a basement finish project:
The smart dry bar: $4,000-$9,000. 6-8 foot quartz counter, base cabinetry, floating shelf backbar with LED lighting, beverage fridge, outlets where they belong. This tier, placed correctly per Lesson One, outperforms badly-placed wet bars costing three times more.
The full wet bar: $10,000-$20,000. Everything above plus sink, faucet, drain/supply plumbing, dishwasher drawer or compact dishwasher, often an ice maker, more linear footage.
The showpiece: $20,000-$35,000+. 10+ feet, waterfall stone, full-height tiled feature wall, multiple refrigeration units, kegerator with tap tower, custom millwork, designed pendant array. The tier from our game-day showpiece configurations — spectacular, and worth it exactly when the entertaining lifestyle is real.
(These live inside the full-basement budget tiers from this week's cost breakdown — a full wet bar is a meaningful chunk of what moves a project from the "full finish" tier to "premium.")
Frequently Asked Questions
Does a basement bar add resale value?
In the St. Louis family-suburb market: a well-placed bar within a finished basement adds appeal and photographs powerfully in listings, but it's the finished basement doing the heavy value lifting — the bar is seasoning. Build the bar for your life; let the basement carry the resale math (per this week's cost post: 60-75% recovery on the whole project).
Kegerator: worth it?
For genuine regular beer drinkers who host: yes, and plan it during design — it needs its dedicated spot, outlet, and ideally a drip-zone floor surface. For everyone else: it's the most-abandoned bar appliance we see. The glass-front beverage fridge is the universally-used alternative.
Can I add a bar to an already-finished basement?
The dry bar: absolutely — it's cabinetry, an outlet circuit, and lighting, $5,000-$10,000 retrofit. The wet bar: depends entirely on drain access; over finished floors it means opening the slab or accepting a pump system. This is exactly why we preach the rough-in-now philosophy during original construction.
What about a coffee/morning bar instead of an alcohol-focused bar?
Quietly one of the best briefs we get — same architecture (counter, fridge, shelving, water line if you want a pot-filler or plumbed espresso machine), used every single day instead of weekends. Several of our best "bars" are dual-purpose: coffee station by day, bar by night. Design is identical; only the shelf contents change.
How much clearance behind the bar for the working side?
36 inches minimum between counter and backbar, 42 for comfort — same aisle math as kitchens. Skimping here to gain room elsewhere makes the bar miserable to work; if the space can't support proper aisles, build a single-sided console bar instead of a two-sided layout.
Build the Bar That Gets Used
Tell us how your household actually entertains — honestly, not aspirationally — and we'll design the version that earns its square footage: right location, right wet/dry answer, right size. It's a framing-stage conversation, so it belongs in your basement's design phase, not after drywall.
Covenant Contracting designs and finishes basements across the St. Louis metro — Fenton, Wildwood, Ballwin, Chesterfield, St. Peters, Grover, Valley Park, and surrounding areas. Free walkthrough consultations.
Request Your Free Basement Consultation →
Or call (314) 282-1991.